Troubleshooting Inability to Access Configured Volumes in the Backup Repository
KB ID: 101040
Problem:
Users encounter issues during backup due to the inability to access volumes configured within the backup repository.
Causes:
1. Cluster Setup and Volume Accessibility:Backup failures may occur if the sub-node lacks access to the volumes that are configured in the backup repository.2. Inaccessible Network Drive:Backup failures can result from the network drive specified in the backup repository configuration being inaccessible.3. Backup Server/Backup Agent Service Running Under Local System Account:When the Backup Server or Backup Agent service is running under the Local System account, backup operations may fail due to insufficient access privileges
Solutions:
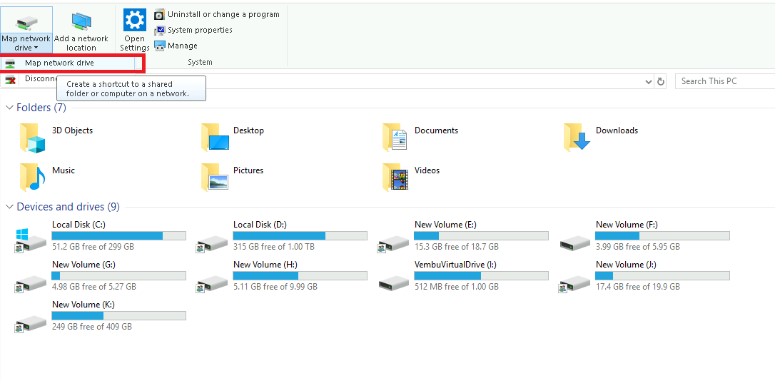
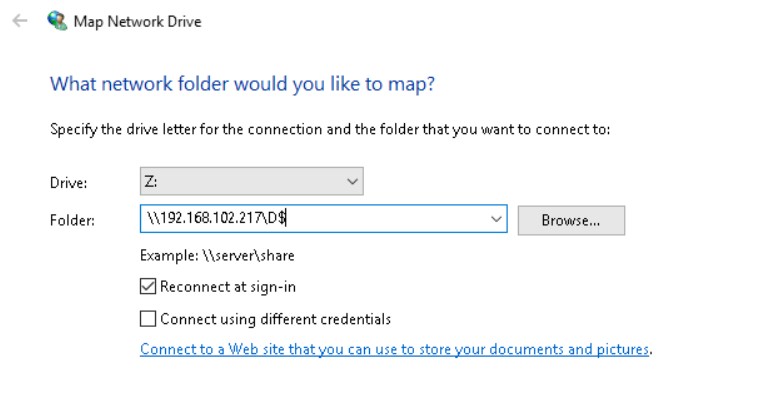
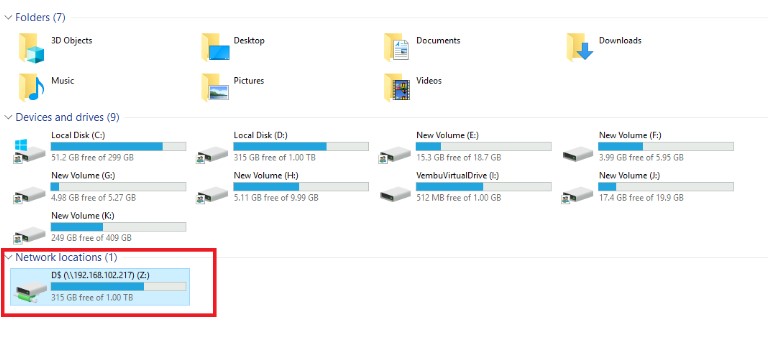
Cause 1: Cluster Setup and Volume AccessibilityTo address this issue, it is recommended to incorporate the storage volumes as Network Drives using the "Add Network Drive as Storage Volume" option within the BDRSuite Server designated as the backup repository.Steps:1. Navigate to Backup Server → Backup Repository → Block Storage → Manage Network Drive → Add Network Drive as Storage Volume.2. Enter the Drive Path, Display Drive Name, Username, and Password. Save the information.3. The added Network Drive will be displayed accordingly.4. Proceed to Block Storage → Create New Block Storage Repository, and select the added Network Drive. Create the repository.Ensure that all volumes configured in the backup repository are manually mounted or mapped across all sub-nodes. This is essential for the sub-nodes to properly identify the storage volumes, preventing backup failures.To Mount/Map the Network drive navigate to File Explorer, under Computer tab click "Map Network Drive".While Mapping Network Drive in File Explorer, make sure to enter the same Drive Letter provided in "Add Network Drive as Storage Volume" in BDRSuite.Only the Network Drive that you have mapped will be attached and shown in the File Explorer. Follow the same procedure for all the Sub nodes.Cause 2: Inaccessible Network DriveVerify the accessibility of the configured network share used as the backup repository from the Backup Server or Backup Agent. If the network share credentials have changed, update the latest credentials by using the ‘Edit Network Drive’ option on the Backup Repository page for the respective backup repository.Cause 3: Service Logon Account ModificationIn each node of the cluster(in case of BDR Cluster deployment), alter the service logon account for the respective BDRSuite Service, whether 'BDRSuite Backup Server for Virtual Physical Workloads' (up to v52) or 'BDRSuite Backup Server Virtual Physical Workloads' (from v53), to run under an administrator user account.Steps:1. Open the Run window by pressing 'Win + R' keys.2. Type 'services.msc' and click OK.3. Right-click on the designated service and select 'Properties'.4. Proceed to the 'Logon' tab, select the 'This account' radio button, and provide administrator user credentials in the format: .\username. Click OK.5. Stop and restart the service to apply the updated logon settings.
Refer the same steps for 'BDRSuite Delegation Service/BDRCloud Delegation Service' service in the backup agent side.
Related Articles
Troubleshooting Guide: Unable to Create Backup Repository
KB ID: 102193 Description: This error occurs when the application fails to create a backup repository. This error typically indicates issues with the storage location or permissions necessary for the backup process to function properly. Possible ...Restore operation failed due to the inability to retrieve data from the Object Storage Repository.
KB ID: 190017 Cause: This problem arises when the BDR Backup Server or Offsite DR Server encounters difficulty in accessing data from the designated Object Storage Repository. This can be attributed to one of the following factors: 1. Connectivity ...Troubleshooting Backup Failure: Unstable Writers or Excluded Volumes Issue
KB ID: 501007 Issue: Backup failed with the error message: "Unable to perform application-aware processing as the writers are not stable in the instance (or) all the volumes in the instance are excluded." Cause: This issue can occur due to the ...Resolving "Storage Disconnected: Unable to retrieve the backup data from the Storage repository configured in the server"
KB ID: 115108 Cause: This error occurs when the volumes configured in the storage pool are disconnected, inaccessible from the server, lack sufficient permissions, or if backup storage repositories are manually removed. Solution: 1. Ensure Storage ...Configuring Azure Blob as a Backup Repository
BDRSuite allows its users to choose their Azure Blob storage as a repository for all its backup data. Azure Blob storage, an object storage solution for the cloud from Microsoft is designed to manage huge volumes of unstructured data. The backup data ...


